Emmet – A must see if you ever write HTML!

June 7, 2018
Reading Time: 2 minutes

VS Code + Emmet

If you’ve spent any amount of time programming, you will learn quickly to enjoy a particular editor or IDE. The great part of Visual Studio Code is that you can extend it in ways that you’d never believe sometimes. Emmet is just one of those ways.

Emmet might be the coolest extension I’ve seen. The ability to expand a sequence of characters into actual HTML or CSS is incredibly nice – especially once you get into the habit of using it.

Contents

  1. HTML5 Boilerplate
  2. Tag Manipulation
  3. Custom Tags
  4. CSS
  5. Cheat Sheet

HTML5 Boilerplate

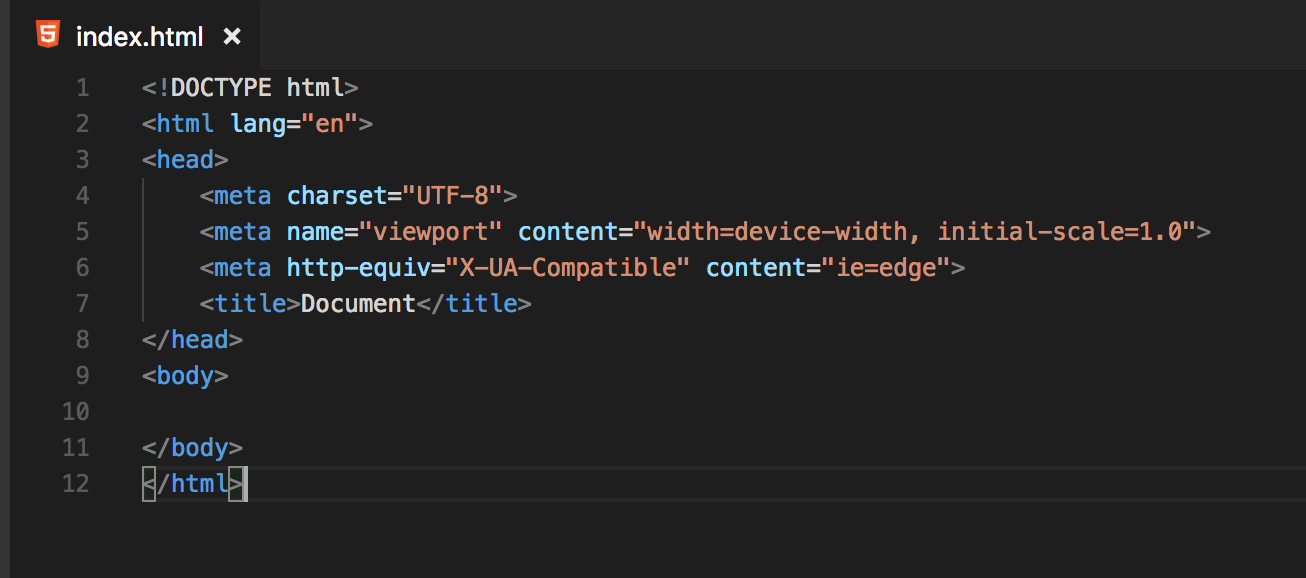
Take this for example:

Just some boilerplate HTML5 setup syntax.

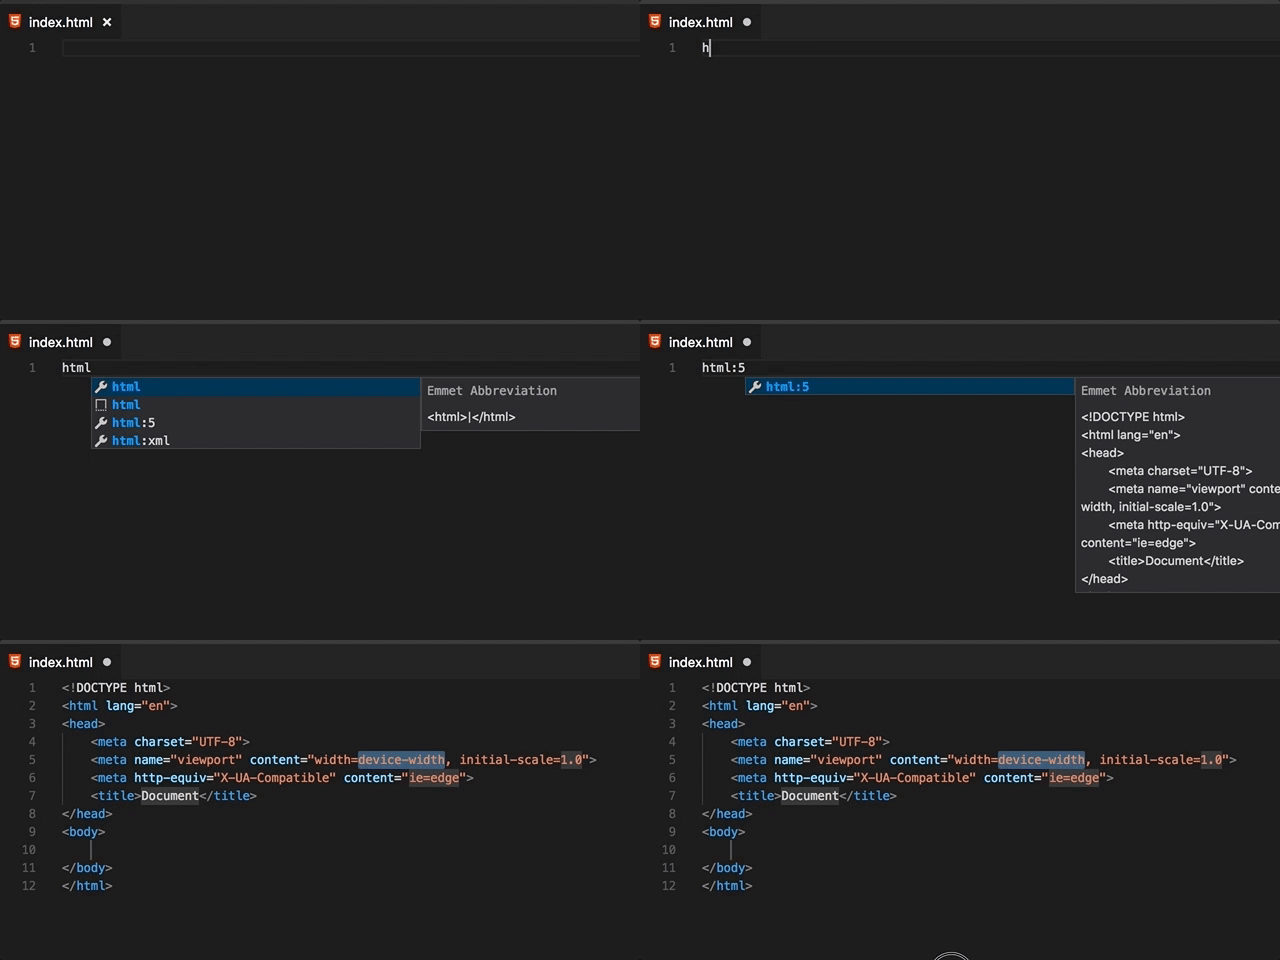
Believe it or not, you can very quickly create this with 6 characters and a ‘tab’ – ‘html:5’, tab

Check it out:

Emmet simple expansion for html5 boilerplace

Very cool!


Tag Multiplication

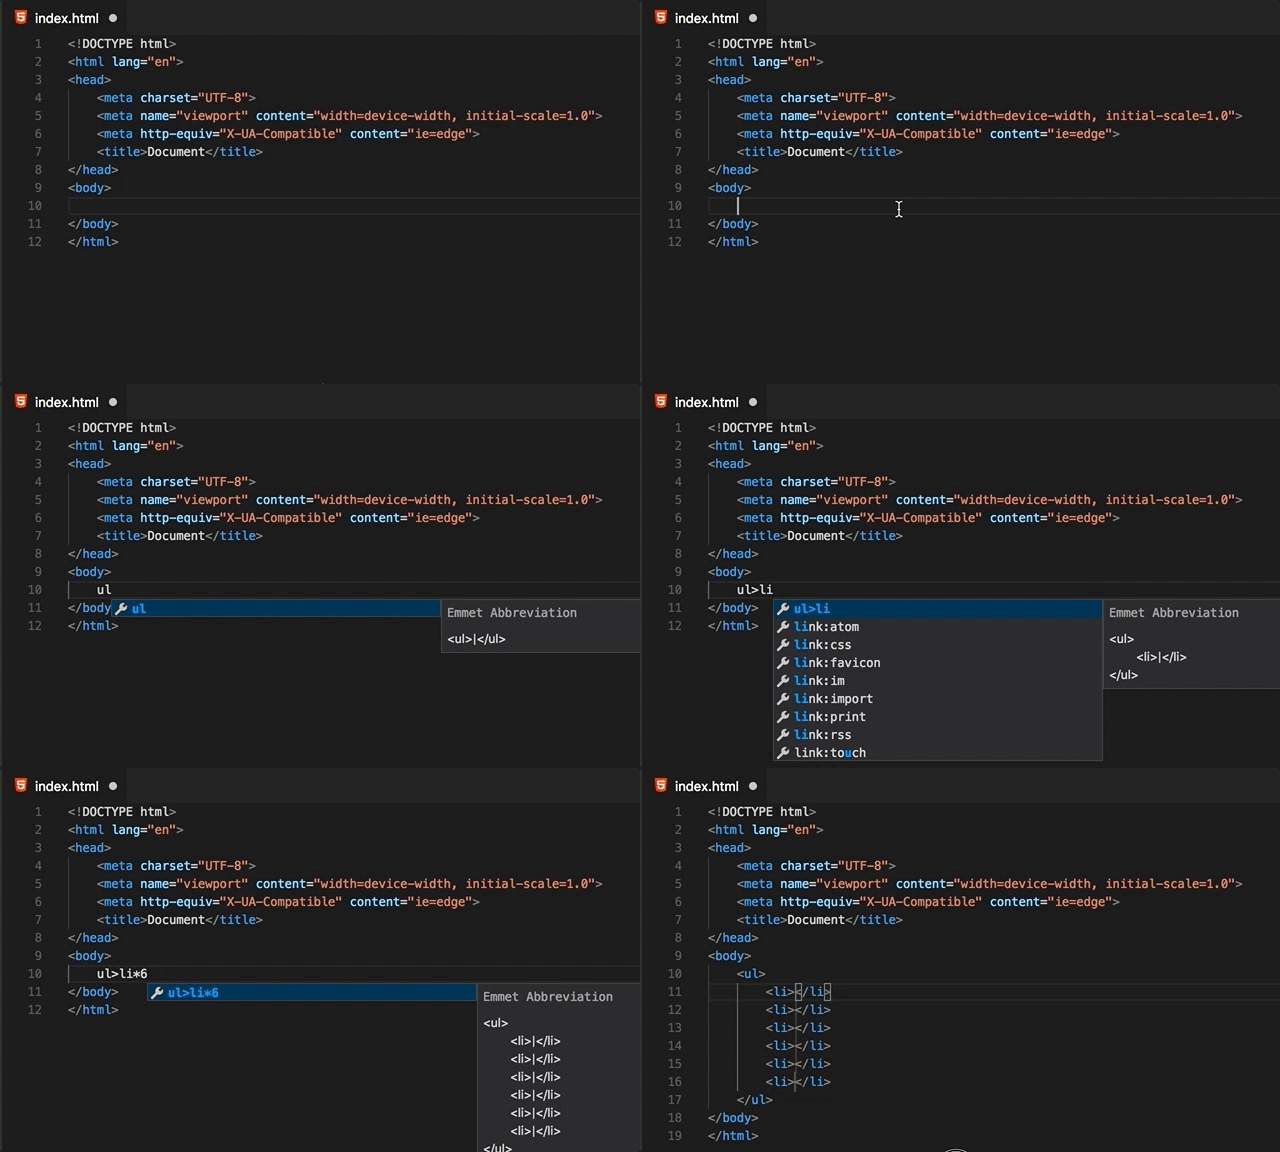
The power of Emmet really comes into play when you’re looking to create an expansion of some slightly more complex html. For instance, what could be a common scenario is to have a list with many list items in it. Doing this again requires very little work:


Custom Tags

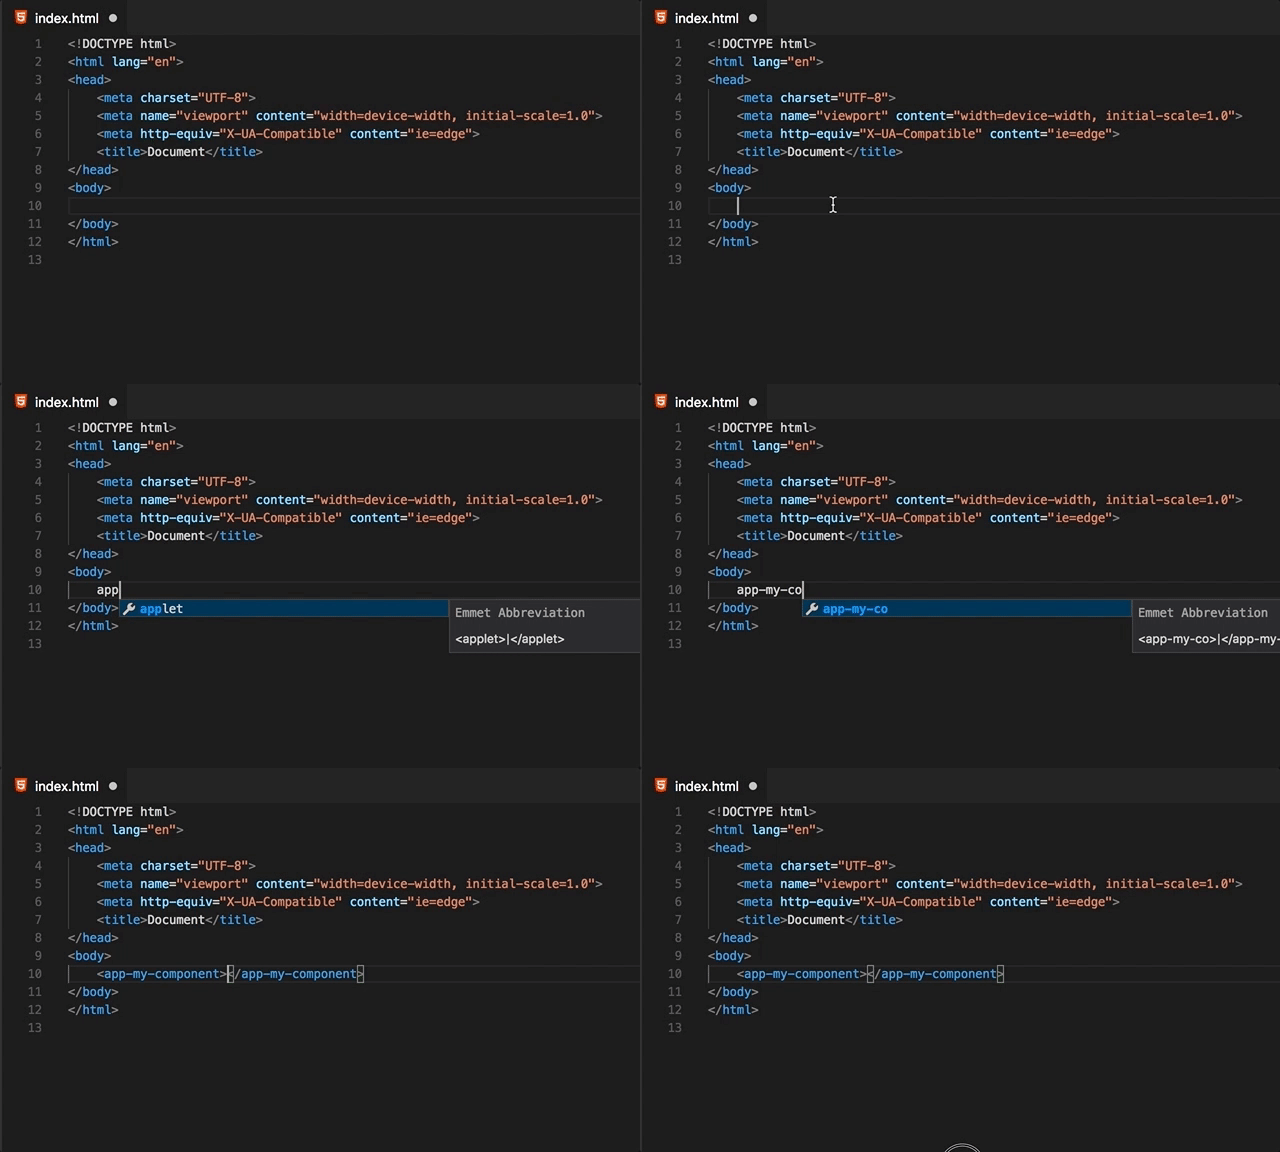
It even works for custom HTML tags, which is especially nice when working with a front end framework like Angular, React or Vue:

This extension is just extremely flexible.


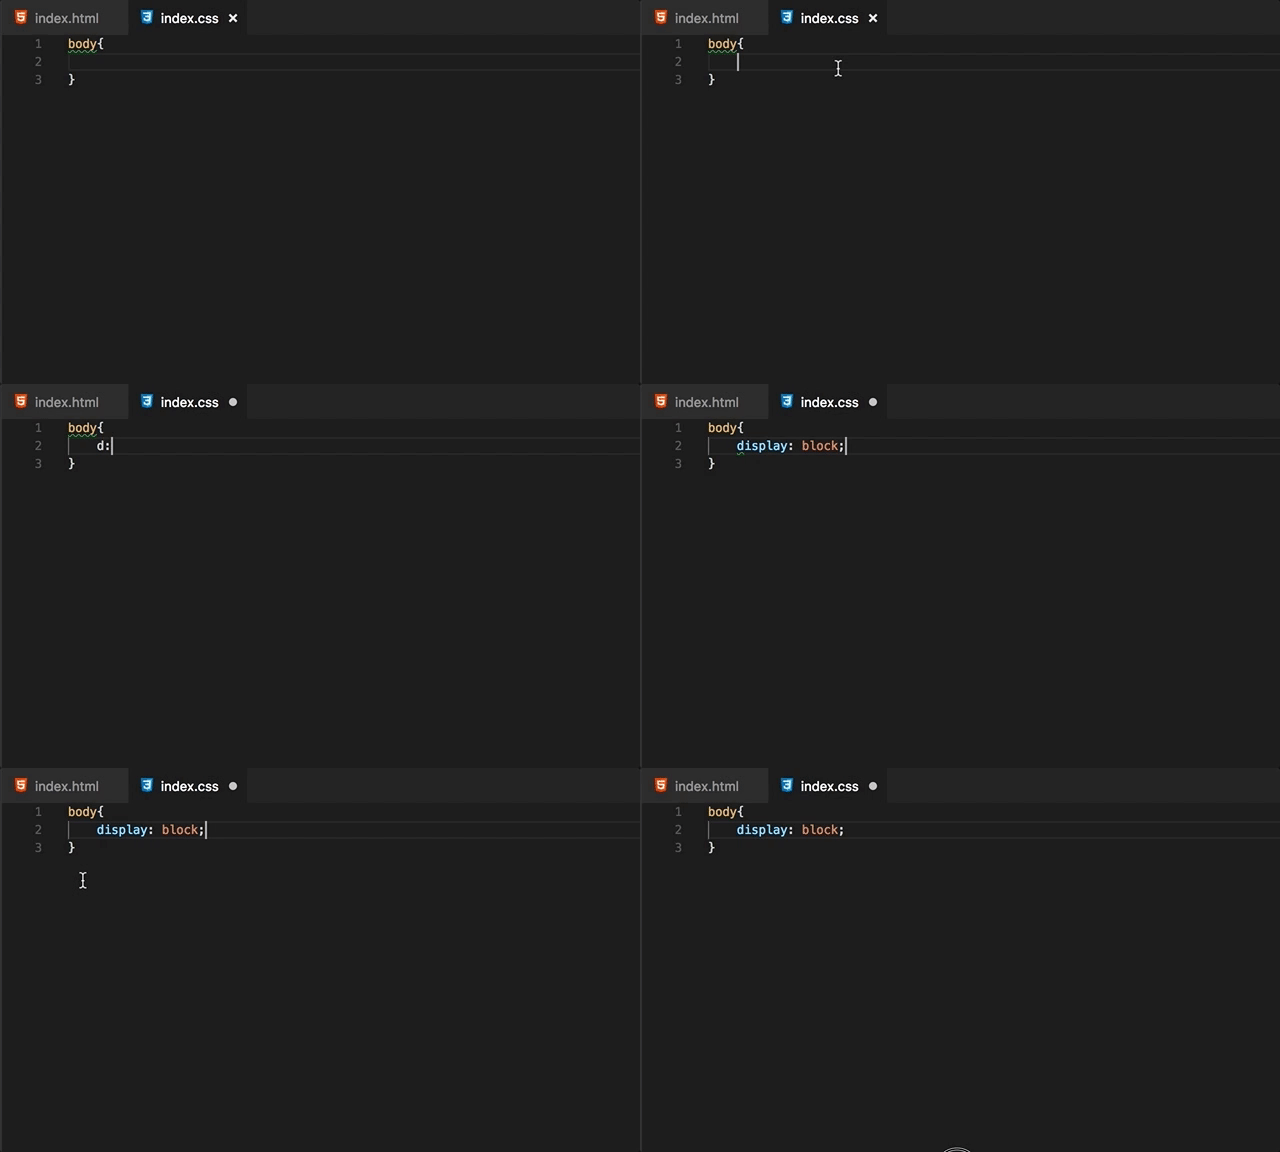
CSS

Another area that you can utilize Emmet is with CSS files too.

Just incredible how well it speeds up boilerplate syntax.


Cheat Sheet

There are so many shortcut sequences that it’s quite overwhelming to say the least, but to get it down you will be crazy efficient. Check out the entire Emmet cheat sheet here: https://docs.emmet.io/cheat-sheet/

Conclusion

One of the most important parts of development unfortunately (or fortunately?) requires us to create a lot of the same exact code/syntax with very similar constructs all the time. Being able to be more efficient when working with that boilerplate set will allow you to spend more time working on solutions – a win for everyone. If you get a chance, I highly recommend seriously using Emmet. You won’t regret it.

Hiatus Over! Get More Efficient Today!

May 26, 2018
Reading Time: 1 minute

It’s been well over a year since I last made a write up. In that time I’ve seen contracts and projects come and go. I’ve created a full-stack startups MVP (Angular/Node) and continued building my client list. I’ve taken the time to get a great feature of using async/await in ES6 to good use – it makes reading async code a lot easier. And, I’ve also updated the theme for the blog.

Currently I’ve been looking to get further integrated with Blockchain and developing additional iOS apps. I already have a number of contributions to some additional Crypto currencies. Being able to work with many talented individuals over the last year has also been a great experience. I look forward to discussing these and other technologies as I work with them.

If there’s one thing you should start doing today it would be to get a Jenkins build server setup and working for the work that you’re doing, whether it’s Web or Mobile. The amount of additional efficiency that you’ll gain will be significant.

Here are some of my favorite Jenkin’s Plugins:

1) Slack Notification Plugin – Get slack notifications for your jobs as they build (or fail)

2) Publish Over SSH – Allows me to very easily setup everything to be pushed to the deployment target.

3) Embeddable Build Status – Whether your using a formal PR setup, thus allowing the code mergers to understand the build status of your branch, OR if you have a repo that you want others to know about the build status, this very handy plugin gives quick build details to a user.

4) Sounds Plugin – I sometimes don’t want to watch for build notifications, but would rather hear a sound on success / failure. This plugin allows just that.

iOS Auto Layout Programmatically

May 4, 2017
Reading Time: 2 minutes

For some reason getting a grasp on ios auto layout programmatically seemed to be a bit of a challenge and most of the resources I found on it were scattered or not very good.

The official Apple docs on ios auto layout programmatically seemed over the top on theory and then how it describes what you should do isn’t very clear, at least for me anyways.

I found the following to be pretty helpful in understanding it clearly and a good approach:

Resource Guide

  1. Watch this video. The guy explains in the first seven minutes what exactly Auto Layout is looking for in order to work: https://www.youtube.com/watch?v=R0PrgE_PKSg
  2. Learn about anchors:
    1. https://cocoacasts.com/working-with-auto-layout-and-layout-anchors/ 
    2. https://stackoverflow.com/questions/36507043/programmatically-creating-constraints-bound-to-view-controller-margins
  3. Bookmark these resources from Apple:
    1. https://developer.apple.com/reference/uikit/nslayoutconstraint
    2. https://developer.apple.com/library/content/documentation/UserExperience/Conceptual/AutolayoutPG/index.html#//apple_ref/doc/uid/TP40010853
  4. You may not need it right away but understand what the compression resistance and hugging priorities are.
  5. The default content compression resistance priority is 750.
  6. The default content hugging priority is 250.
  7. Don’t forget to set

    translatesAutoresizingMaskIntoConstraints = false.

  8. The constraints won’t always show until you call <myView>.layoutIfNeeded().
  9. Activate and Deactivate constraints. Don’t use add/remove.
  10. Keep a reference to the constraints that you will change later.
  11. Wrap a UIView.animate around the constraint changes and layoutIfNeeded() call.
  12. Create some basic layouts with Xcode and see how things do and don’t work – keep it simple and then build on that. Some suggestions of things to make:
    1. A background image/color expanding the entire width and height of the screen.
    2. An image centered in the middle of the screen, offset from the top.
    3. A dropdown accordion. Example: https://codepen.io/fainder/pen/AydHJ
    4. Two buttons, side by side equal spaced and equal size. Hint: https://stackoverflow.com/questions/28148843/ios-autolayout-two-buttons-of-equal-width-side-by-side
    5. A scroll view with a content view inside of it with components in the content view to make the content view be a dynamic height.
    6. Add items that change location on the screen from tapping, and animate with UIView.animate. Take it a step further and do with Keyframe Animation.
  13. Go watch the 2015 WWDC Videos on Mysteries of Auto Layout. Note: Must use Safari to view.
    1. https://developer.apple.com/videos/play/wwdc2015/218/
    2. https://developer.apple.com/videos/play/wwdc2015/219/

Conclusion

Follow all of the items under the resource guide and you will be a lot more confident with doing ios auto layout programmatically.

Install A New Cocoa Pod Module, Can’t Import

April 8, 2017
Reading Time: 1 minute

I’ve been working a ton with Swift and iOS and ran into this problem when I had an existing project using CocoaPods, where when I installed a new cocoa pod module, I couldn’t import it.

Basically when I went to do the ‘Import ModuleName’ statements to bring the newly installed pods into my project, they weren’t in the Auto Complete dropdown! I tried updating, upgrading, removing, etc. NOTHING WORKED.

Until I actually clicked on the Pods project itself in the side bar, set the build target to ‘Generic iOS Device’ and clicked on ‘Product’ -> ‘Build’.

Once I did that, everything magically worked for me. Hopefully this will help you if you run into this same issue.

Large Scale AngularJS App

December 18, 2015
Reading Time: 2 minutes

My list of how not to completely screw yourself over on a large-scale AngularJS project – The biggest project I’ve done has gone from Angular 1.0.x to 1.4.x. These are what my findings were:

  1. Setup the style guidelines right from the get-go. Seriously, this simple starting point will in the end give you at least the advantages of keeping code clear. John Papa has a community driven one on github that’s excellent.
  2. Get comfortable with directives. Review the way that some of the more popular ones are setup and created. DRY is your friend in any application, and doubly so in a large one.
  3. Be sure that everyone that is going to be working on the design end of it (CSS, LESS, SASS, etc.) are capable of the work. The more complex the CSS of the site, the more potential to royally screw up the UI there will be.
  4. I suggest having everyone watch at least the JavaScript Good Parts video with Douglas Crockford. It’s available on Pluralsight and I think Frontend Masters.
  5. Setup your Linters from the get go. JSCS and ESLINT are my preference. I also highly suggest Uncss and Stylestats for the UI CSS work that’s being done.
  6. Consider a LESS or SASS Library to standardize some basic mixins to use throughout the UI.
  7. If possible, get at least Directive unit tests working properly. It’ll save you many debugging headaches.
  8. Be sure to well document an actual snippet for your directives for use in a top of file comment block. Nothing more annoying than needing to use a random directive that requires you to read all the code to know how to use it properly.
  9. Most browsers work properly most of the time, until you open things in IE.
  10. Get auto-deploy setup to dev servers. Makes having the latest builds available to QA a lot easier when somewhat centrally managed.
  11. If you use $broadcast just throw your computer out of the window.
  12. Don’t roll your own translation directive. Use angular-translate or another community option.
  13. Get used to arcane console.log errors.
  14. If you encounter your app having infinite digest cycle errors, you’ll realize very quickly that they’re not easy to diagnose. I highly suggest reading my post on finding them in a large app and what worked for me.

I may add more to this list in the future – but have fun and make cool stuff!

Absolute Positioned Textarea Text Not Appearing

September 15, 2015
Reading Time: 1 minute

I’ve been doing a LOT of CSS with my projects as of late, mainly with SASS and LESS, but that isn’t related to this issue.

In creating a popover textarea entry directive, I got all of the CSS in place and then noticed that for whatever reason the textarea wasn’t showing any text that I entered into it.

It would appear if I toggled any of the CSS properties in the Chrome Dev Tools, however, my issue remained. If I removed the position absolute, it would work. I was clueless as to what would resolve this, but at least I could see changes when modifying stuff.

And then I noticed, I had wrapped the outermost tags for the directive in <span> tags like this:

When I set the <span> tags to <div> tags, voila, everything worked as I had intended. After looking into it further, I realized that the span tags only should be used for inline-level components, and I was using <div> elements inside of the <span> tags, which are block-level elements. As a result, the <span> tag breaks the html in that it doesn’t allow block-level children.

So if you run into an issue like this, check the surrounding tags. Here’s a W3C detail on the span tag for those interested in further technicals: http://www.w3.org/TR/html51/semantics.html#the-span-element

MEAN Stack – Full Test Sample Application

August 28, 2015
Reading Time: 1 minute

In order to help the development community at large, I thought I’d push out the app that I had used in my write up for testing the MEAN stack. You can check it out on github here: https://github.com/SBero/mean-todo

It still has some work needing to be done to it, but enough is currently done to help others get started with fully testing their MEAN apps.

I’d like to get it to the point, where it’s the perfect sample project for someone new to the MEAN stack to be able to review, pick up some best practices and see exactly how to do the testing that’s involved (especially testing all of the isolate scope parts of an AngularJS directive!).

AngularJS Multiple Identical API Calls

August 11, 2015
Reading Time: 1 minute

With a large AngularJS application, and even smaller ones, you can run into this issue where you end up with multiple identical API calls being made if your using the $q service. This occurs because there is a conflict with overlapping calls, which basically re-try the last API call for all of the call conflicts.

This happens when you aren’t bundling all of the calls up with the $q.all() function. This function receives an array of $http service objects that will resolve to an array once they’re all returned from the server.

You need to pass into the $q.all() function http promise objects which can be retrieved from the $http service.

For example:

Eliminating the .then after the $http and doing just  return $http(req); will get you the promise to add to the array which you’ll pass to $q.all().

Contracting vs Employee vs Freelance?!

July 31, 2015
Reading Time: 3 minutes

I’ve always been adamant about the fact that I have only so many working years in me. Maybe another good 30 years? Maybe only 20? Maybe 40? It’s hard to say without a crystal ball to tell me my future.

In the development world there are definitely no shortage of opportunities, and with so many different directions that you can go in, it can often times leave people not knowing what they’re missing or they get comfortable doing one thing and don’t broaden their horizons. I’m talking about Contracting vs Employee vs Freelance. With having a finite number of working years, it would be best to try and see if there’s one type of employment you prefer earlier rather than later. Happiness and all, you know.

Having personally done 2 of the 3, I can say so far, they all have their pros and cons.

Employees get (usually) treated with more respect at the organizational level, but tend to make less money than say Contracting. This obviously can change if you’re able to land a decent high base salary development gig, but I’ve only encountered maybe 2-3 in the hundreds of opportunities that have been in front of me where the compensation is comparable. Most often, people don’t average their actual hours worked vs compensation and so there’s an even bigger financial loss than realized. Employees will however, usually be given different bonuses and/or perks, possible training or ownership options with a company and be able to buy possibly stock at a discount. Then you also have the ability to move up in the ranks of the company. So you end up playing more of the long game depending on your goals and ambitions.

Freelancing can be good, if you have the knack for it. I sort of did. However, I found it to be a bit stressful when clients were very late in payments or would delay projects. Not only would my scheduling get all messed up, my finances would start taking a hit too. Not too fun when you have a family to support. Freelancing on the side however, can be a great way to make some extra cash while learning some new technology or creating a new platform.

Contracting (Staff Aug. specifically) has been what I found to be the almost like a combination of both worlds. I get paid hourly while still having the flexibility to work on cutting edge stuff and having the ability to work both remote or in-office. I 99% of the time run things as Corp to Corp. so that I can at least get the tax advantages that come with having a business. You aren’t treated the same as employees, and nor should you be, but I found that if you have a good personality and ability to connect with people, as I feel I do, this can really be the best of both being almost and Employee but getting paid for every hour worked. I really enjoy when companies allow me to work more than 40 hours, just because hard hourly stops don’t make sense to me and there’s always more work to do than a simple 40 hours. I tend to prefer going between 50-70 hours per week with times of doing just 40 to doing a few months of extra hours. But when you’re passionate about development, the hours melt away like nothing. How many times have you looked up at the clock and said, “Crap! It’s already 4pm!”.

I recently saw this one web site called TopTal and decided to apply to see what it’s all about. It’s a Web Engineers Network, or at least that’s the area that I’m submitting to. It looks like an interesting approach, rather than the typical “Hey, I’m a recruiter, here’s job XYZ followed by a list of Do you know this and that.” It looks like TopTal actually technically screens candidates properly, with people who actually understand and/or are actual programmers. If anything this should make connecting with better companies much easier, as they know technically you’ve already been screened. I look forward to seeing what opportunities something like TopTal opens up should I move forward and be accepted in their system.

The take away from this, is regardless of what route you choose to go with, at least understand the pros and cons of the different employment options in this field. If you can try doing a few of the different employment options, I highly suggest it. You’ll meet new people, learn new things and most of all, you’ll get to experience some different parts of life that you may not even realize how much more you like it.

Unit Testing Full Stack Part 2 – AngularJS Part 2 of 3

July 26, 2015
Reading Time: 5 minutes

This is part 2 of 3 unit testing full stack javascript. In this post we’ll talk about testing some more of Angular: Services, Directives and Filters.

In case you missed it, this unit testing series of posts are:

Part 2A – Installation, Routes, Controllers

Part 2B – Services, Directives, Filters

Part 2C – Coverage Reports, End to End (e2e)

So let’s get started with where we left off, testing services.

Services

Testing services is actually fairly straight forward. The thing to keep in mind is that you intercept all the requests that would normally go to a backend, and return the status code, etc. that you would expect.

Let’s break down one of the unit tests:

As you can see the $httpBackend is where we describe the type of http call that the service will attempt to do, and we setup how to return back to the service. You can send data to the $httpBackend, having it expect a certain set of data, or have it return specific data to further test the directive. The link to the Angular Site for $httpBackend will help you read about the different ways to utilize it.

Once we call $httpBackend.flush()  we flush all pending requests and respond with the pre-determined responses.

Moving further, you can obviously test any of the functions inside of a service quite easily. Services I would say are one of the easier components to test in Angular.

Directives

I thought that directives were actually one of the components in Angular that I had the hardest time trying to figure out how to properly test all the aspects of. It seems that most people never get into actually testing all of the pieces of them.

Let’s just get into it: isolate scopes are in the vast majority of directives, and most places that show you how to test directives, don’t really specify how to test those.

I’m here to hopefully clear that up. Lets look at en example directive and it’s corresponding code.:
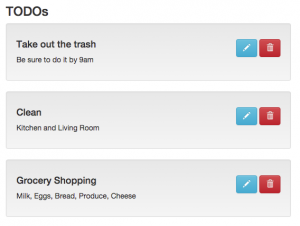
TODO Directive Items

When the user clicks edit, it sets $scope.editing  flag to true, and gives them this view:
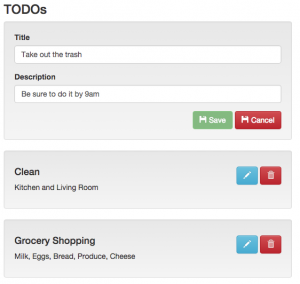
MEAN Todo Directive - Edit Mode

So with that in mind, let’s make a directive unit test that allows us to test those isolate scope functions, check the variables on it, and do a save to the API (intercepted with Mocks), and attempt to do things that give back errors and allow us to accommodate for that.

That’s quite a long set of unit tests, well, 8 of them to be exact.

Do you remember when we setup the testing in Karma, we added the html2js pre-processor? That’s what allows us to load the html template file in the unit test with this piece of code:

To test any bits and pieces of the isolate scope, you need to do this:

We need to call elem.isolateScope()  on the compiled element, digest the scope, so that we get updated and bound scope items. Now with the elemScope  variable that’s returned from calling elem.isolateScope()  we can access any of the isolate scope items, functions, etc. as you can see here with the call to elemScope.editItem() .

Everything else is pretty typical standard stuff relating to testing of services with $httpBackend  and doing a flush()  to validate that the api call is being made and to test different return scenarios (http status codes).

Filters

Testing filters is really quite simple. You would basically invoke them as you would in a controller, testing the return results. Here’s an example:

So that takes care of our 2nd part for testing Angular JS. Please let me know if you have further questions, so that I can enhance the post for others to learn from.

Our final post on Angular testing we’ll discuss coverage reports and End-to-End testing with Protractor.